This is good for R&D when you end up making many images render so you can know how much time this image take in render.
add this script to the OutPutPath field:
This is good for R&D when you end up making many images render so you can know how much time this image take in render.
add this script to the OutPutPath field:
in this video i will show you how you can make Procedural Chiseled Bevels Font or object using vex and volume inside Houdini.
I remember when i start learning Houdini i come cross this blog i was really scare of it and keep saying there is no way i am going to do something like this soon, anyway recently i learn about xyzdist and primuv and i am really amazed about how many thing you can do so guess what come in my mind to try 😉 yes the old blog i mentioned earlier and this is how i did it.
1- first group the collide area.
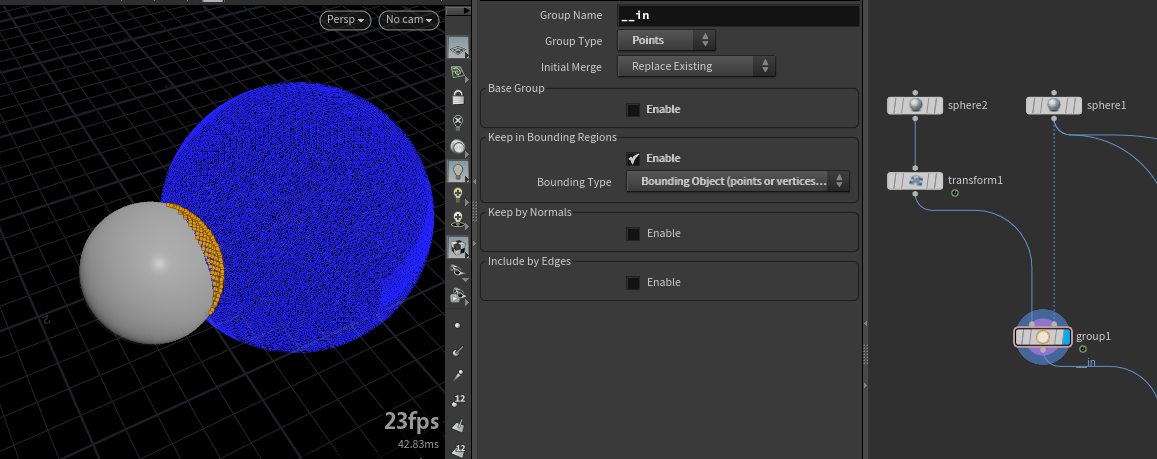
2- create point wrangle and attach your object to input zero and the collision object to input one with this code and make sure this wrangle only effect the group we create in step one:
int hitprim;
vector hitprimuv;
xyzdist(1, v@P, hitprim, hitprimuv);

v@P = primuv(1, "P", hitprim, hitprimuv);

3- add smooth node to avoid hard edge if you wish, otherwise you are good and this is very much how i did it.
One of my favorite a new addition in Houdini 18 the node Copy to Points 2.0 and in this node you can Varying your copy without using for each loop like in the old node and here is how.
Tow week ago i create digital assets then i search everywhere about how can i Create Attribute and Group pull-down list in digital assets and there is an awesome Houdini artist name Elias in Think Procedural Discord website he show me this and it’s turn out it’s required python code and unfortunately i am not good with python maybe i will learn it after vex 🙂 anyway this is how you can do it.
1- Create your channel reference and make sure it’s string.
2- Go to Edit Parameter Interface.
3- click on your channel reference and from Parameter Description open Menu.
4- check Use Menu and change it to Toggle (Field + Multiple Selection Menu).
5- open Menu Script tab and type this python code
for Attribute :
result = []
try:
    geo = hou.pwd().inputs()[0].geometry()

    for attr in geo.pointAttribs():
        result.append(attr.name())
        result.append(attr.name())
except:
        result.append("")
        result.append("")

return result
for Group :
result = []
try:
geo = hou.pwd().inputs()[0].geometry()

for attr in geo.pointGroups():
result.append(attr.name())
result.append(attr.name())
except:
result.append("")
result.append("")

return result
6- now you will find this is only work for point Attribute and Group so what if you want primitive Attribute and Group you can fix it just by change it like this
for Attribute :
result = []
try:
    geo = hou.pwd().inputs()[0].geometry()

    for attr in geo.primAttribs():
        result.append(attr.name())
        result.append(attr.name())
except:
        result.append("")
        result.append("")

return result
for Group :
result = []
try:
geo = hou.pwd().inputs()[0].geometry()

for attr in geo.primGroups():
result.append(attr.name())
result.append(attr.name())
except:
result.append("")
result.append("")

return result
i think you know we only change the word point to prim in the code in this line
for attr in geo.primGroups():


Fit attribute value to 0 and 1 is one of my favorite thing to do in Houdini and i always look for new way to do it and i wish if SideFX make node for this, it’s really important thing to get the the best result for example drive the color by attribute.
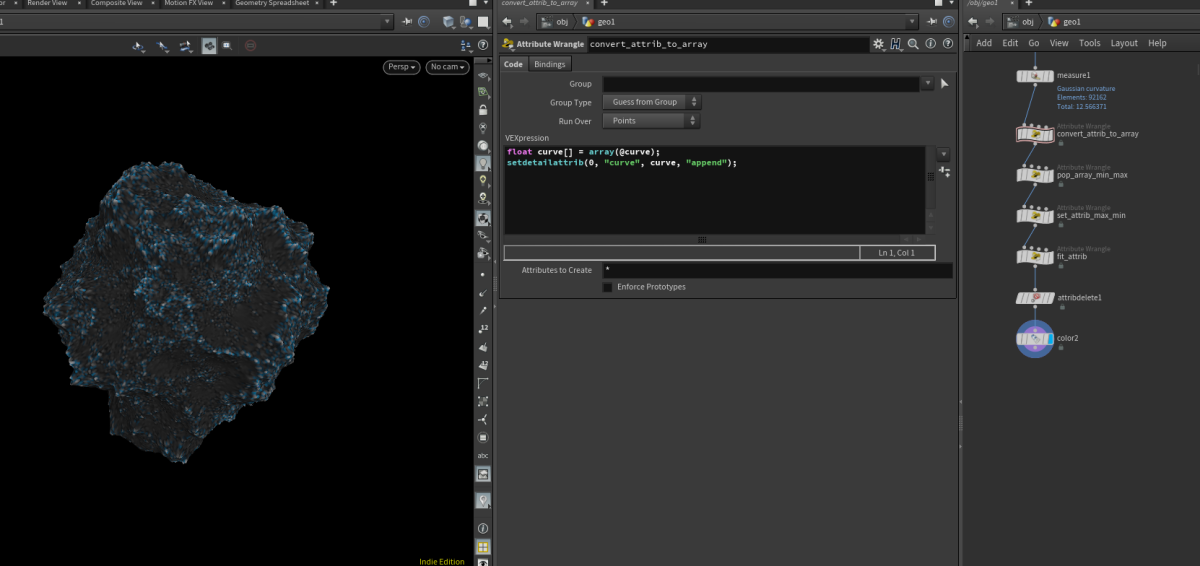
I write a blog here about this topic and this is another way to fit the attribute value to 0 and 1 “only try it with float attribute” and this method is store all the attribute values in an array and then pop the last and first value from a sorted array.
1- store all the attribute values in an array use point wrangle.
float attrib[] = array(@attrib);
setdetailattrib(0, "attrib", attrib, "append");
2- sort the array “Returns the array sorted in increasing order” to get the attribute min value and it’s important here to use detail wrangle.
f[]@myattrib = sort(f[]@attrib);
f@attrib_min = pop(@myattrib, 0);
3- in the same detail wrangle reverse the sort array to get the attribute max value.
f[]@myattrib = reverse(sort(f[]@attrib));
f@attrib_max = pop(@myattrib, 0);
4- promote min and max attribute from detail to point use point wrangle.
setpointattrib(0, "attrib_min", @ptnum, f@attrib_min);
setpointattrib(0, "attrib_max", @ptnum, f@attrib_max);
5- fit the attribute to 0 and 1 use point wrangle.
f@attrib = fit(@attrib, @attrib_min, @attrib_max, 0, 1);
in the end this is really interesting way to get value from attribute but it’s really slow compared to other method i talk about them here.
One of my Hobby to learn vex is Retype VOP node in VEX i am sure for advance coder this is stupid, LOL! but for me i learn many thing from this Hobby especially someone like me have no background in coding ever.
so yah the idea is really simple find in VOP network done by you or anyone and try to recreate it but in vex and use the help file from sidefx and for sure some time you can search in google if you don’t get it.


I used to be think like just use the max and min function and you will be ready to go, however i find it more difficult to get the max and max and min of attribute or maybe it’s just the stupid me. anyway recently i find how to get the min and max and here is how:
1 – loop over all point to get the max and min but this some time is really heavy in calculation.
int all = i@numpt;
string attrib = chs("attrib");

float min = point(0, attrib, @ptnum);
float max = point(0, attrib, @ptnum);

for(int pt=0; pt < all; pt++){
    float comper = point(0, attrib, pt);

    if(comper < min){
        min = comper;
        }
        else{
            if(comper > max){
                max = comper;
                }
            }
    }
2 – promote the attribute to detail then import it back to point i find this way more faster in calculation.
setdetailattrib(0, "attrib_min", @attrib, "min"); setdetailattrib(0, "attrib_max", @attrib, "max");float min = detail(0, "attrib_min", 0); float max = detail(0, "attrib_max", 0);
3- and if you like VOP there is a way to fit max and min of Attribute inside VOP


that’s all for now please share with me in the comment below if you know better way.
11
It’s ben a year now since i start learning Houdini and i am in love everyday and every day new challenge, i will share what i learn and please replay to my post if you want add anything or correct something i am open to learn from anyone so let’s keep learning and see how much we can push or knowledge.


